
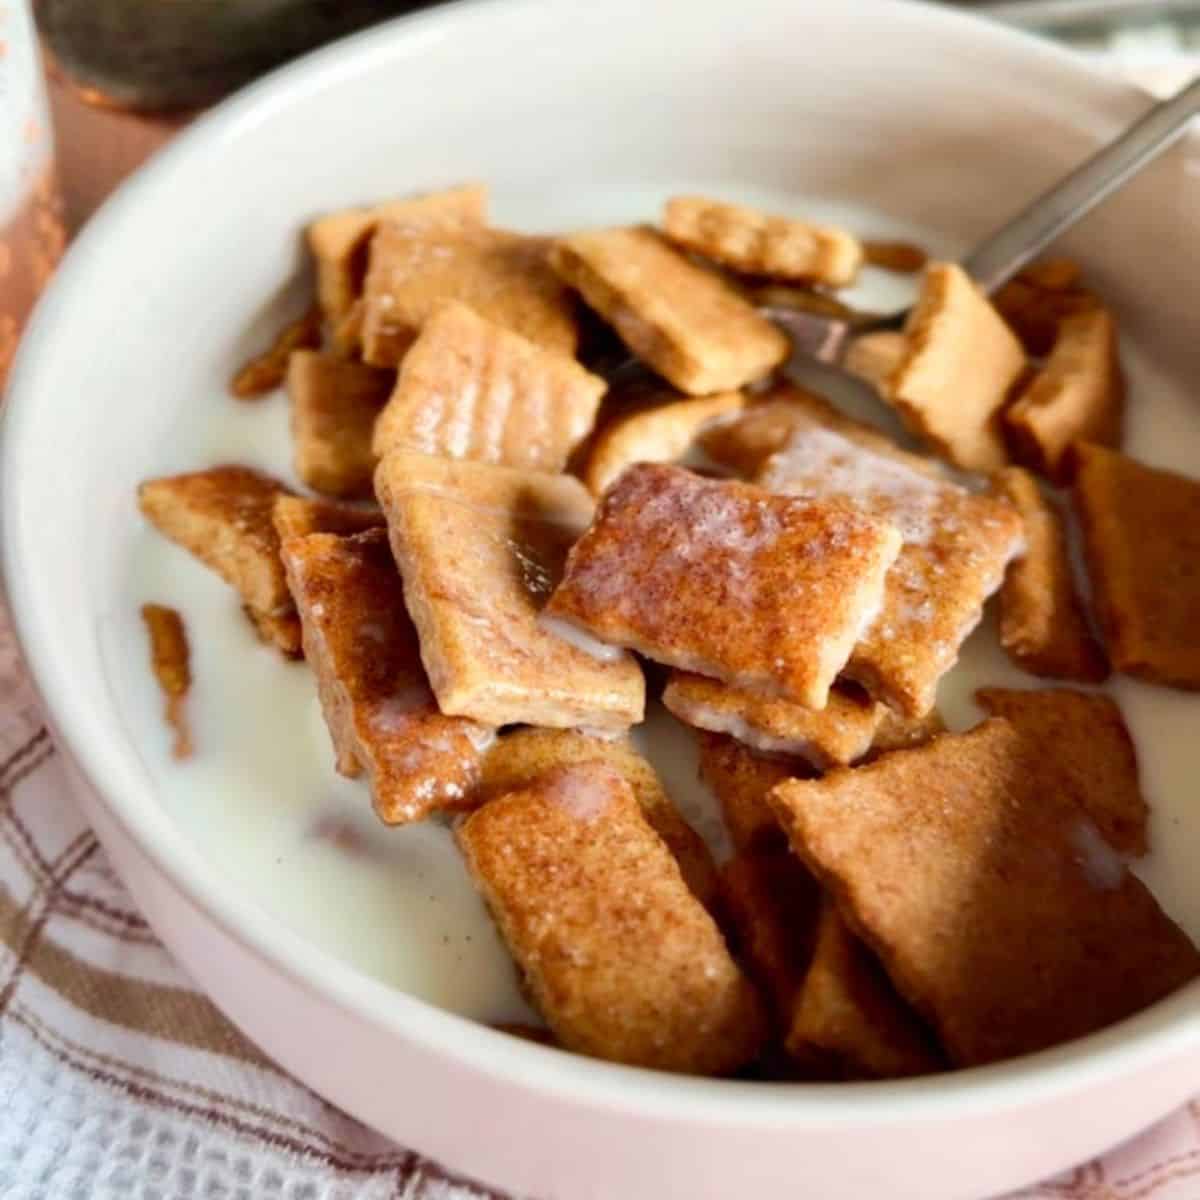
This fresh-milled cinnamon toast crunch cereal is crunchy, lightly sweet, and made with real whole grains you can feel good about. If you love nostalgic cereal but want something fresher and less processed, this homemade fresh milled cereal delivers big time. Once you try it warm out of the oven (or soaked in cold milk), it’s hard to go back.

Summarize & Save This Recipe On:
If you’re serving this cereal as part of a bigger breakfast, it pairs great with simple sides like eggs, fruit, or yogurt for an easy, satisfying meal.
If you're a fan of cinnamon, I suggest you also check out my fresh milled cinnamon rolls! And if you need something quicker for breakfast, give there fresh milled banana muffins with applesauce a try.
Quick Look
- Prep Time: 20 minutes
- Cook Time: 25–35 minutes
- Total Time: ~55 minutes
- Servings: About 4–6 bowls
- Difficulty: Easy
- Baking Method: Conventional or convection oven
- Best For: Breakfast, snack cereal, homemade pantry staple
Jump to:
- Summarize & Save This Recipe On:
- Quick Look
- Important Ingredients
- Substitutions & Variations
- How to Make Cinnamon Toast Crunch Cereal
- Baking Schedule
- 💭Crucial Success Tips
- Recipe FAQs
- How To Store Cinnamon Toast Crunch Cereal
- Other Delicious Recipes
- Fresh-Milled Cinnamon Toast Crunch Cereal
- Need Help Tweaking This Recipe?
- Other Fresh-Milled Recipes You'll Love
Important Ingredients
- Fresh-milled wheat flour gives real whole-grain flavor and allll the health benefits.
- Rice flour adds crispness and makes it crunchy
- Honey + oil keeps it indulgent
See recipe card for quantities.
Substitutions & Variations
- Swap honey for maple syrup for a slightly different flavor
- Add extra cinnamon sugar after baking for a sweeter cereal
How to Make Cinnamon Toast Crunch Cereal
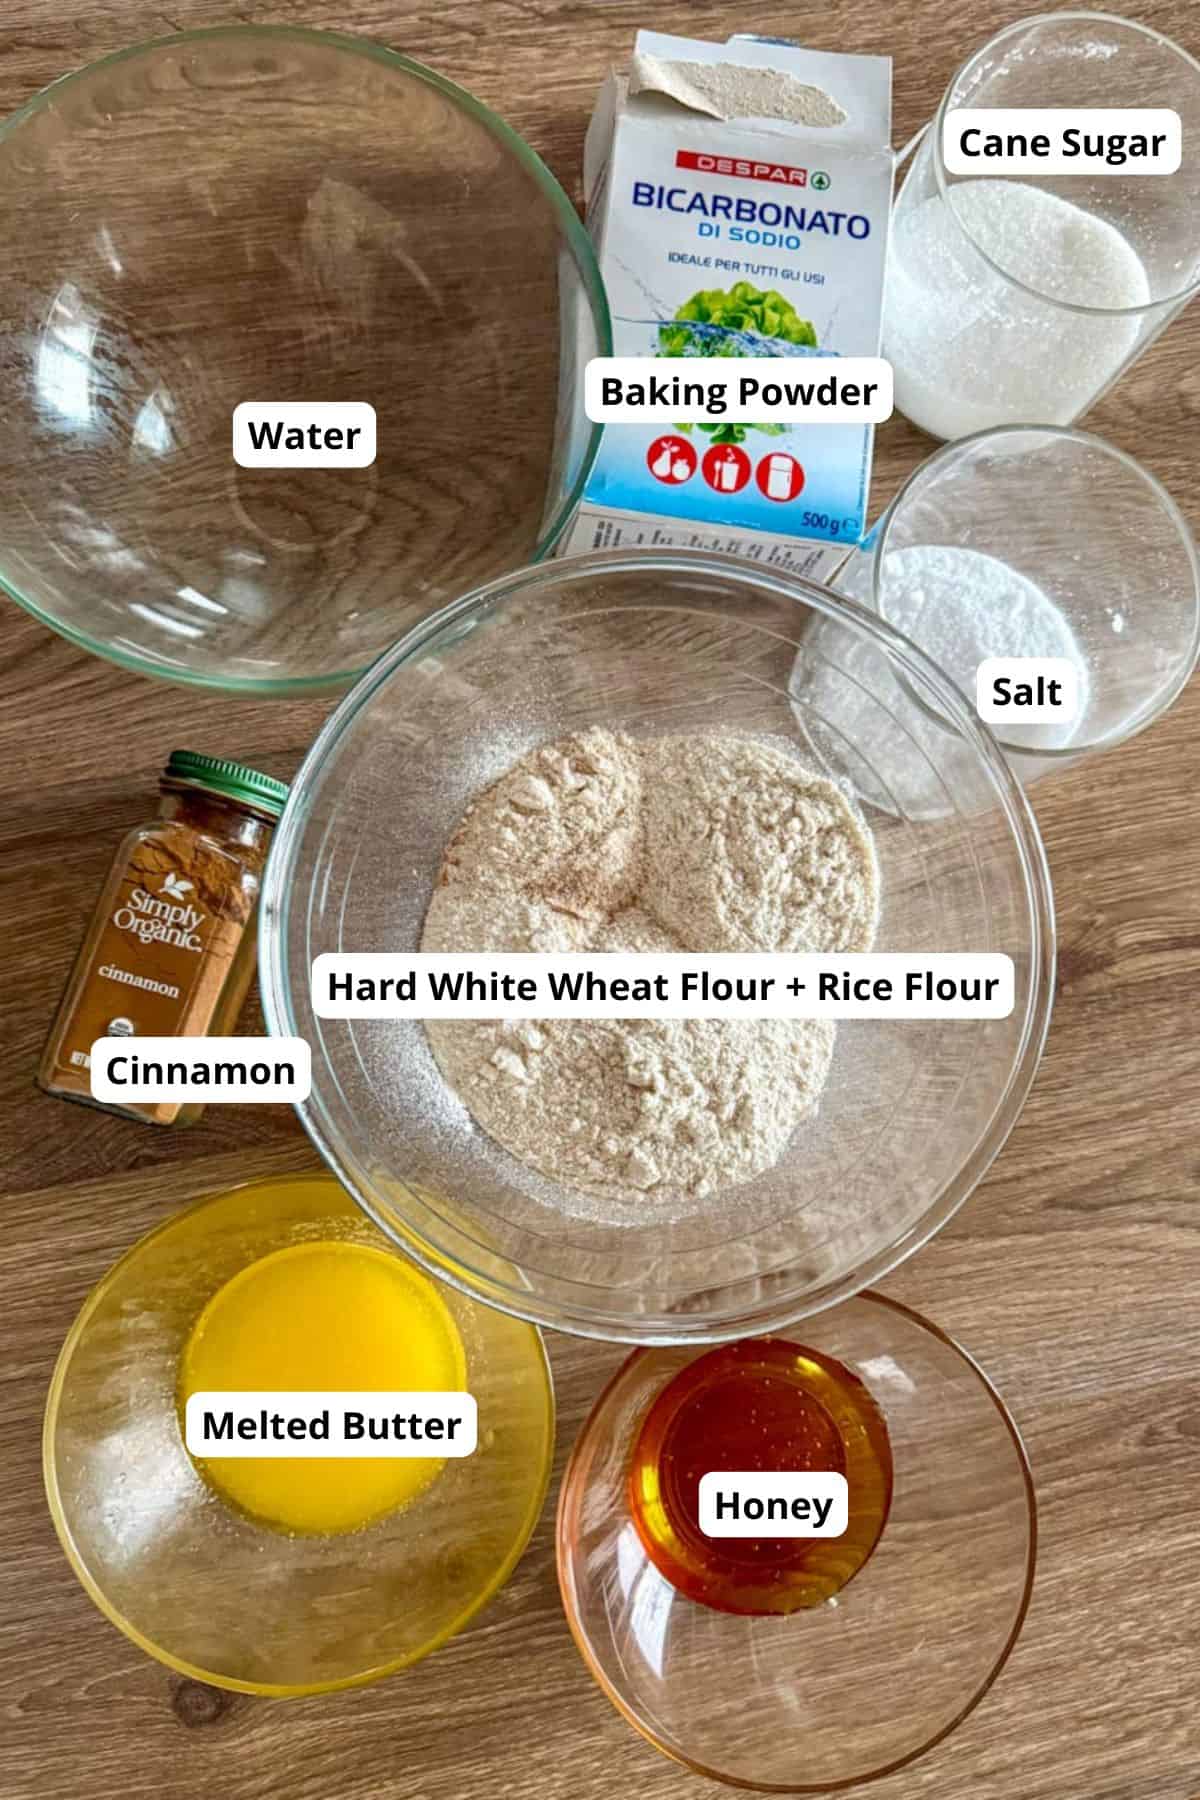
Step 1: Add all the dough ingredients except the cinnamon to a bowl and mix until a soft, pliable dough forms. It should be smooth and easy to handle, not sticky, similar to play dough (Image 1). If it feels dry, add water one teaspoon (5 ml) at a time. If it feels sticky, dust lightly with wheat or rice flour.
I usually just use all-purpose flour here because I don’t want to turn my mill on again for a small amount.
Important note: With fresh-milled flour, resting the dough is often helpful. In this recipe, it is intentionally skipped. The goal is minimal gluten development for a crisp texture, and the high amount of rice flour hydrates very quickly and does not benefit from resting. Resting can make the dough more elastic and harder to roll thin. I’ve rested the dough before when I didn’t have time to finish, and it still worked fine.
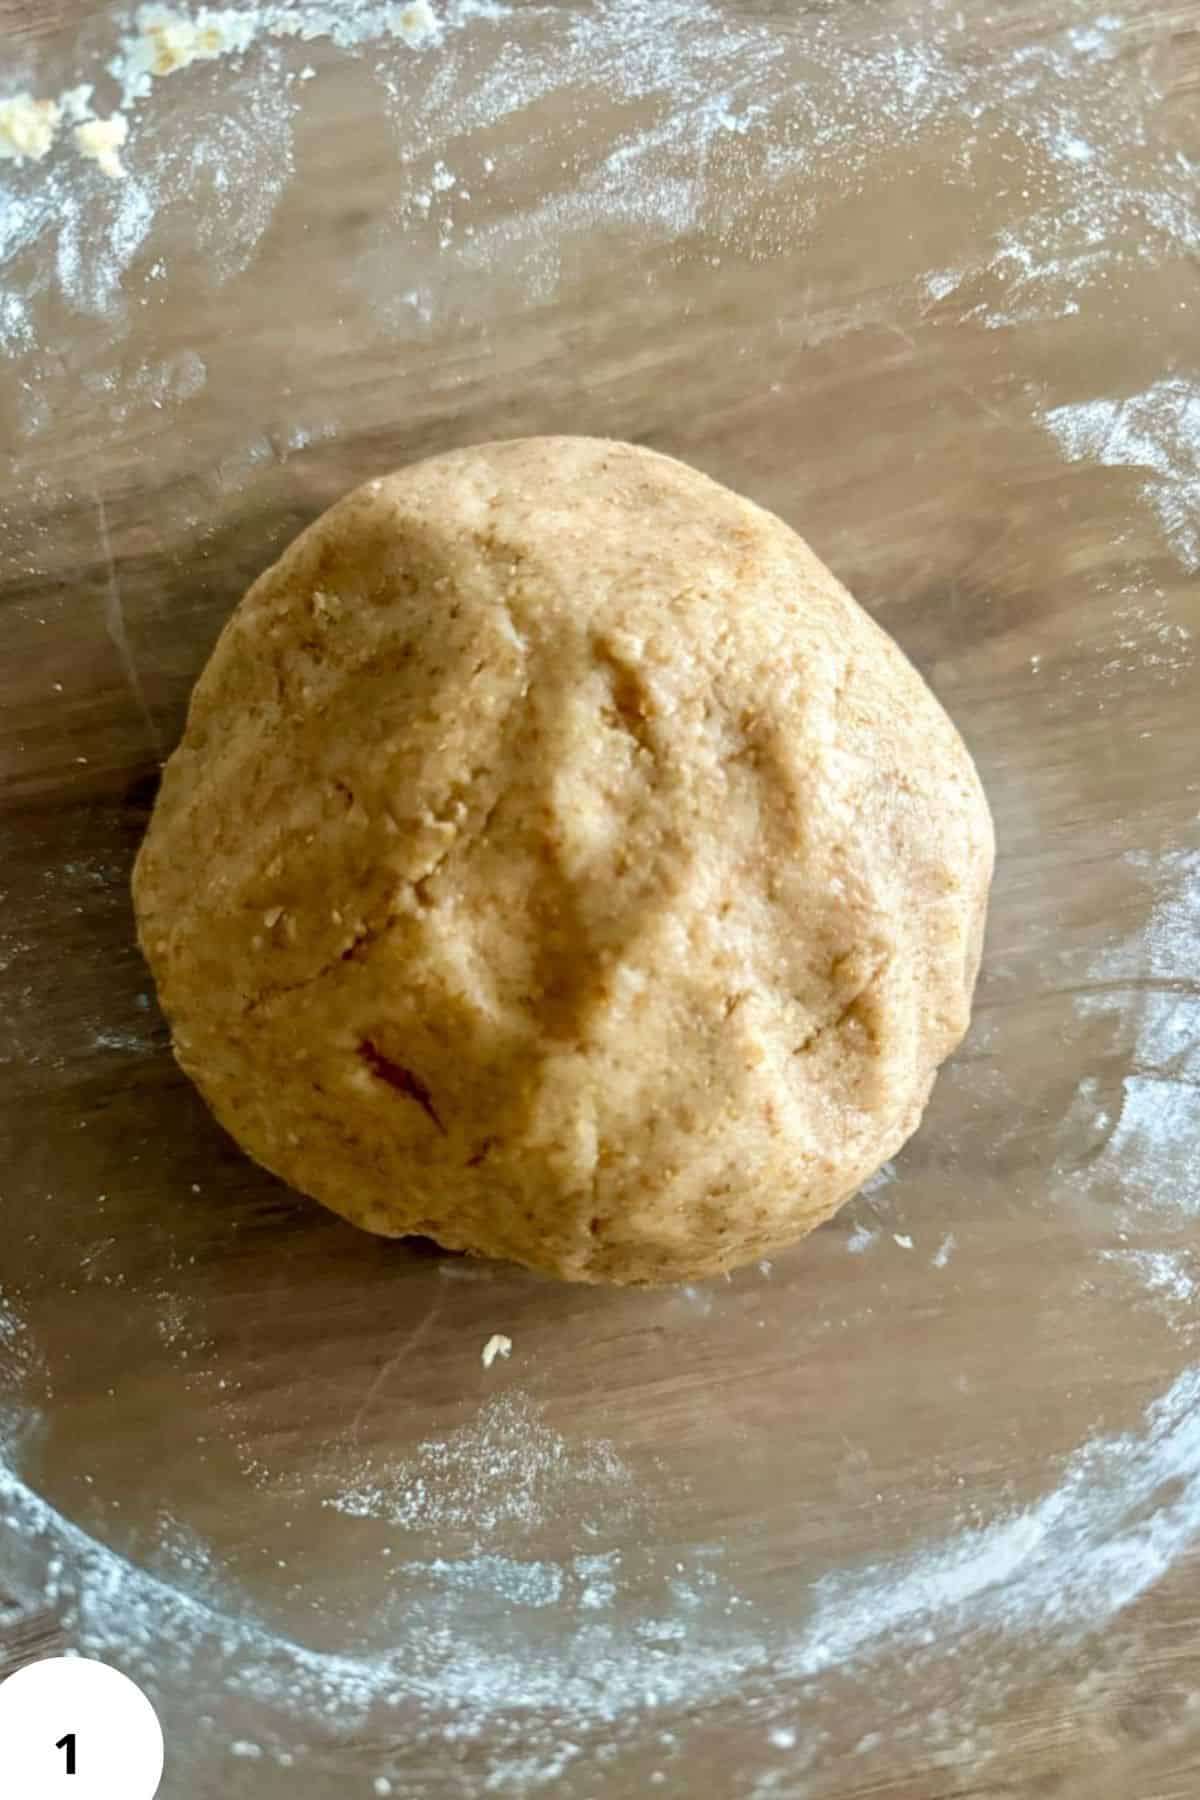
Step 2: Sprinkle the cinnamon over the dough and fold it in gently a few times (Image 2). Leave visible cinnamon streaks. Do not fully mix it in.
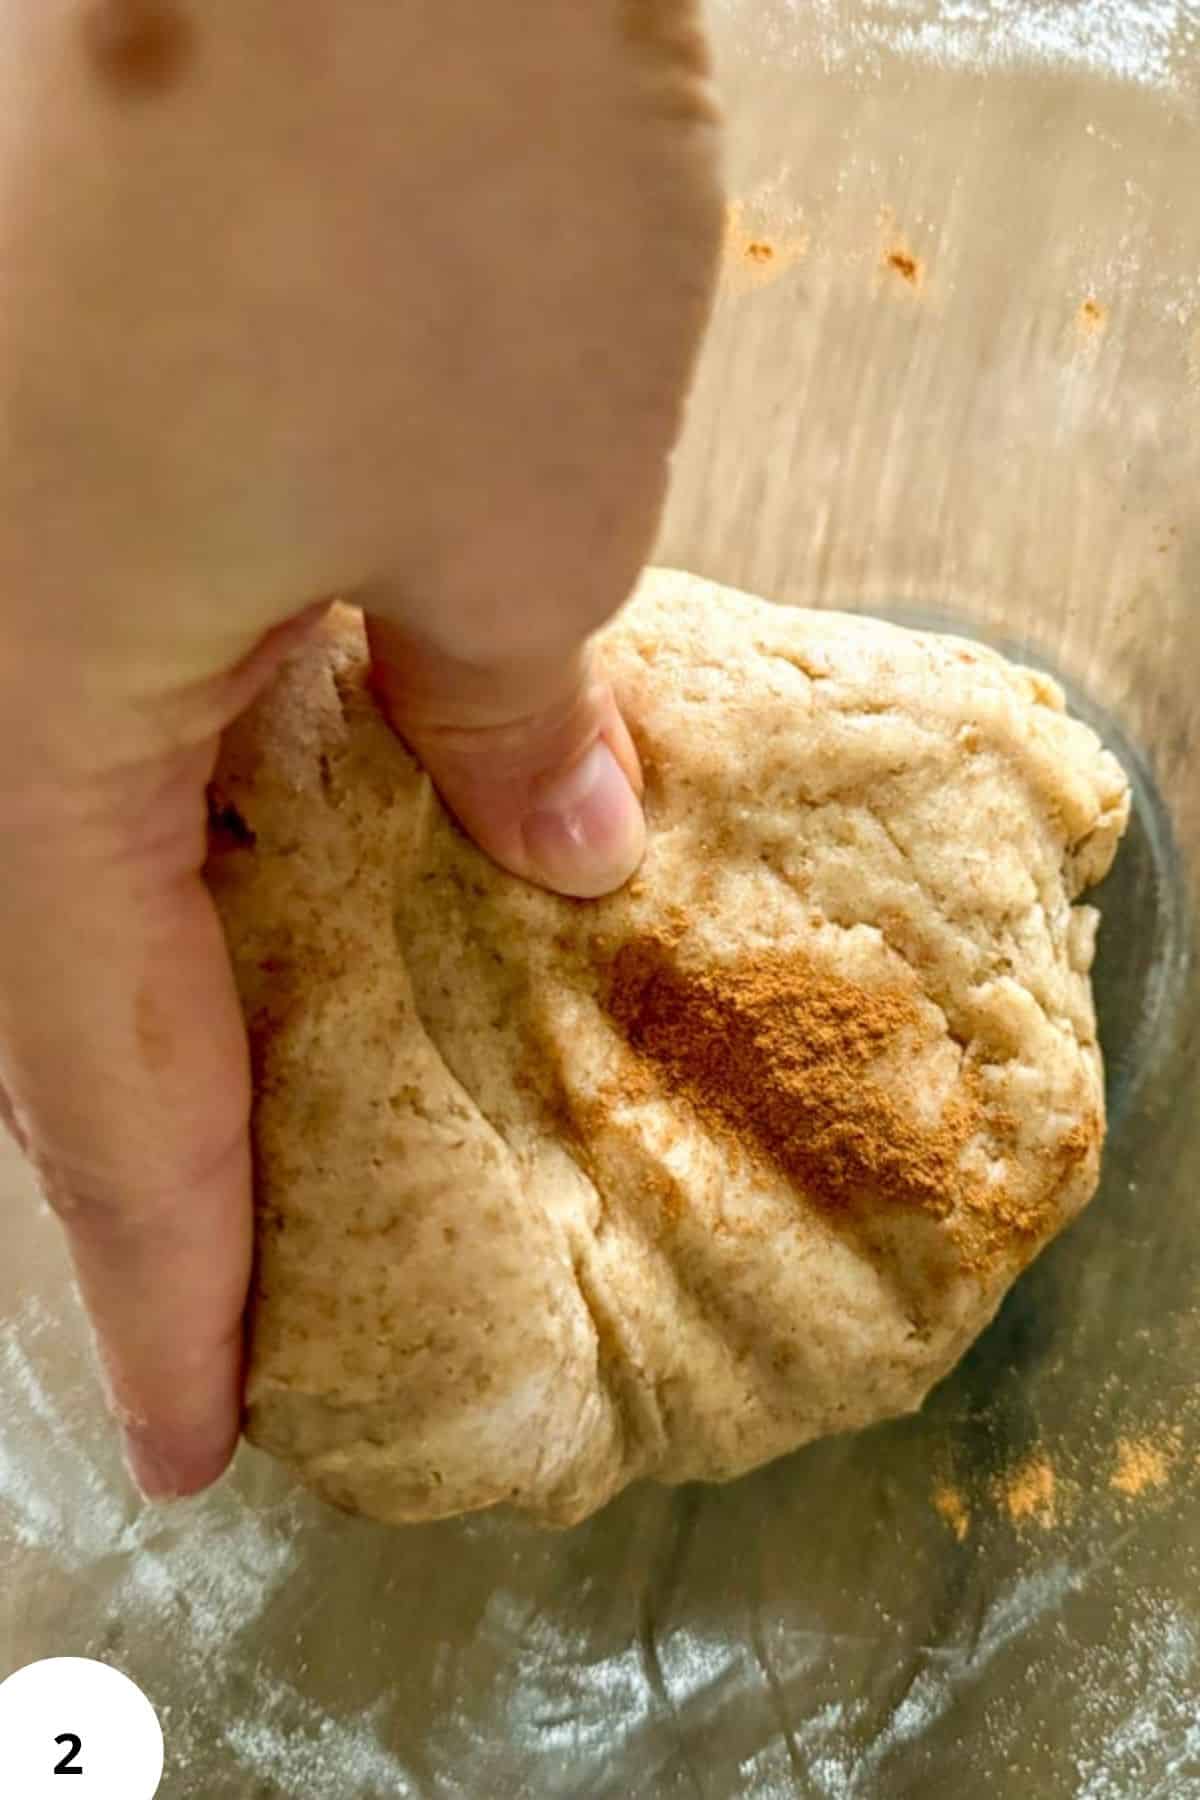
Step 3: Place the dough between two sheets of parchment and roll it very thin, about 1–2 mm thick (roughly 1/16 inch) (Image 3). Thinner dough means crunchier cereal. Remove the top parchment and sprinkle lightly with cane sugar (or extra cinnamon, if you like).
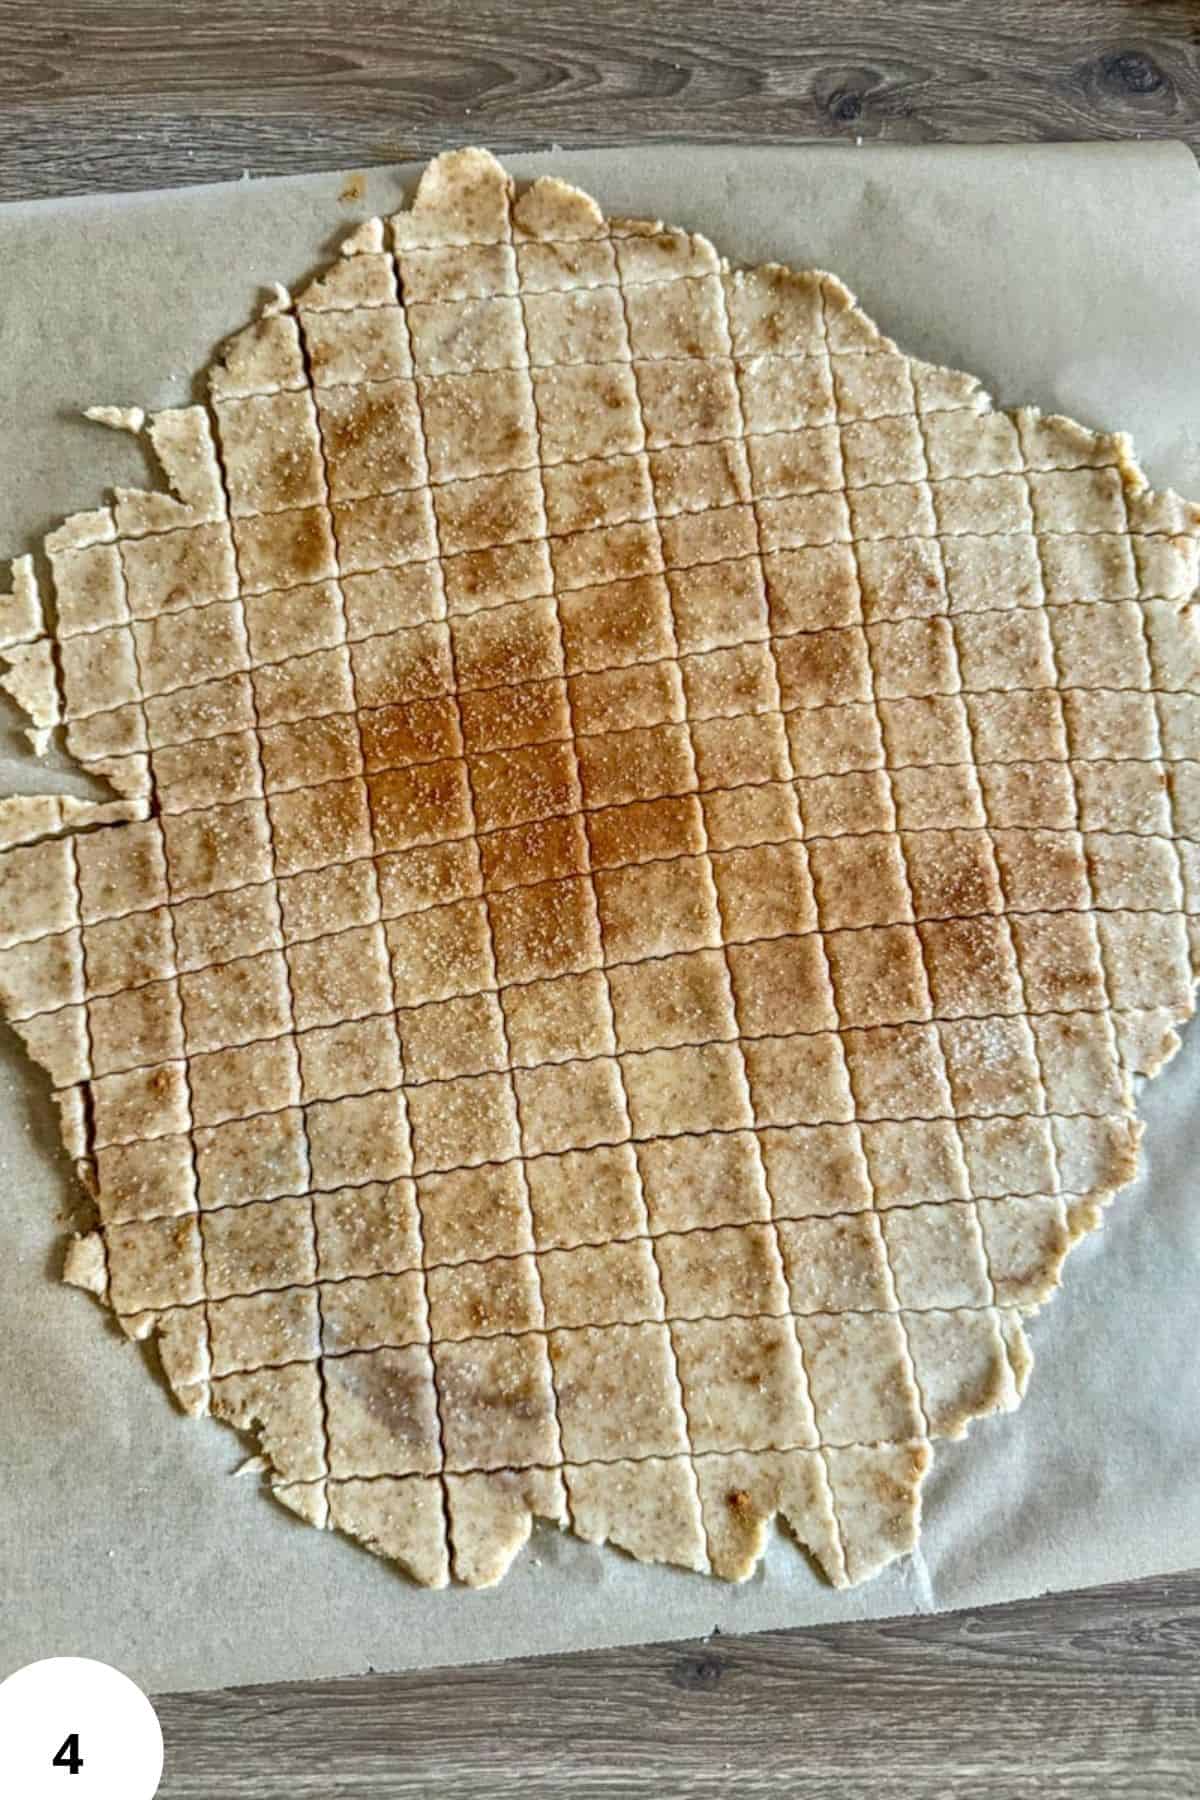
Step 4: Cut into small squares about 1–1.5 cm, or around ½ inch wide (Image 4). Perfect shapes are not necessary.
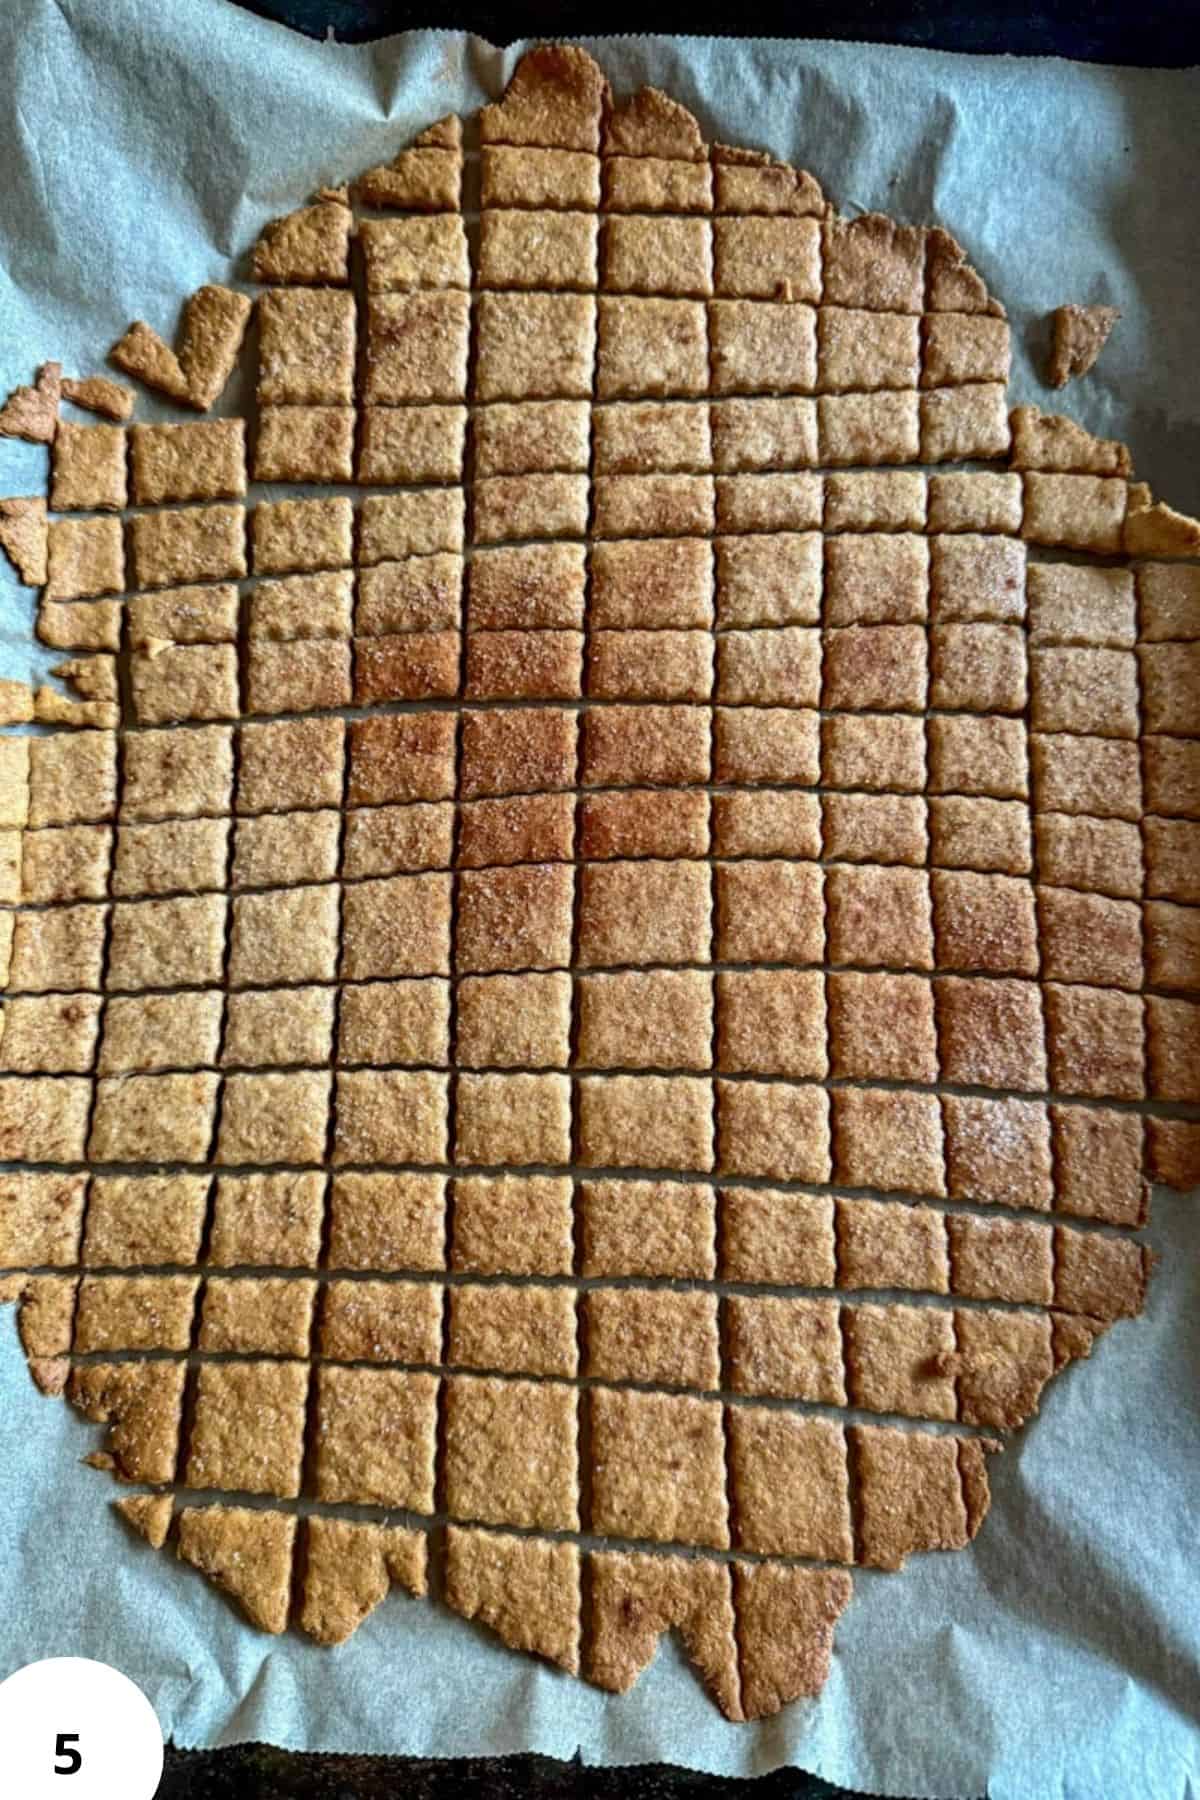
Step 5: Transfer the parchment to a baking sheet and bake briefly to set the dough.
- Conventional oven: 190°C (375°F) for 6–8 minutes
- Convection oven: 175°C (350°F) for 5–7 minutes
Lower the oven temperature and continue baking until fully dry and crisp (Image 5).
- Conventional oven: reduce to 150°C (300°F) and bake 15–25 minutes
- Convection oven: reduce to 135°C (275°F) and bake 12–20 minutes
Rotate the pan once or twice. The cereal is done when the pieces feel firm and dry with no softness in the center.
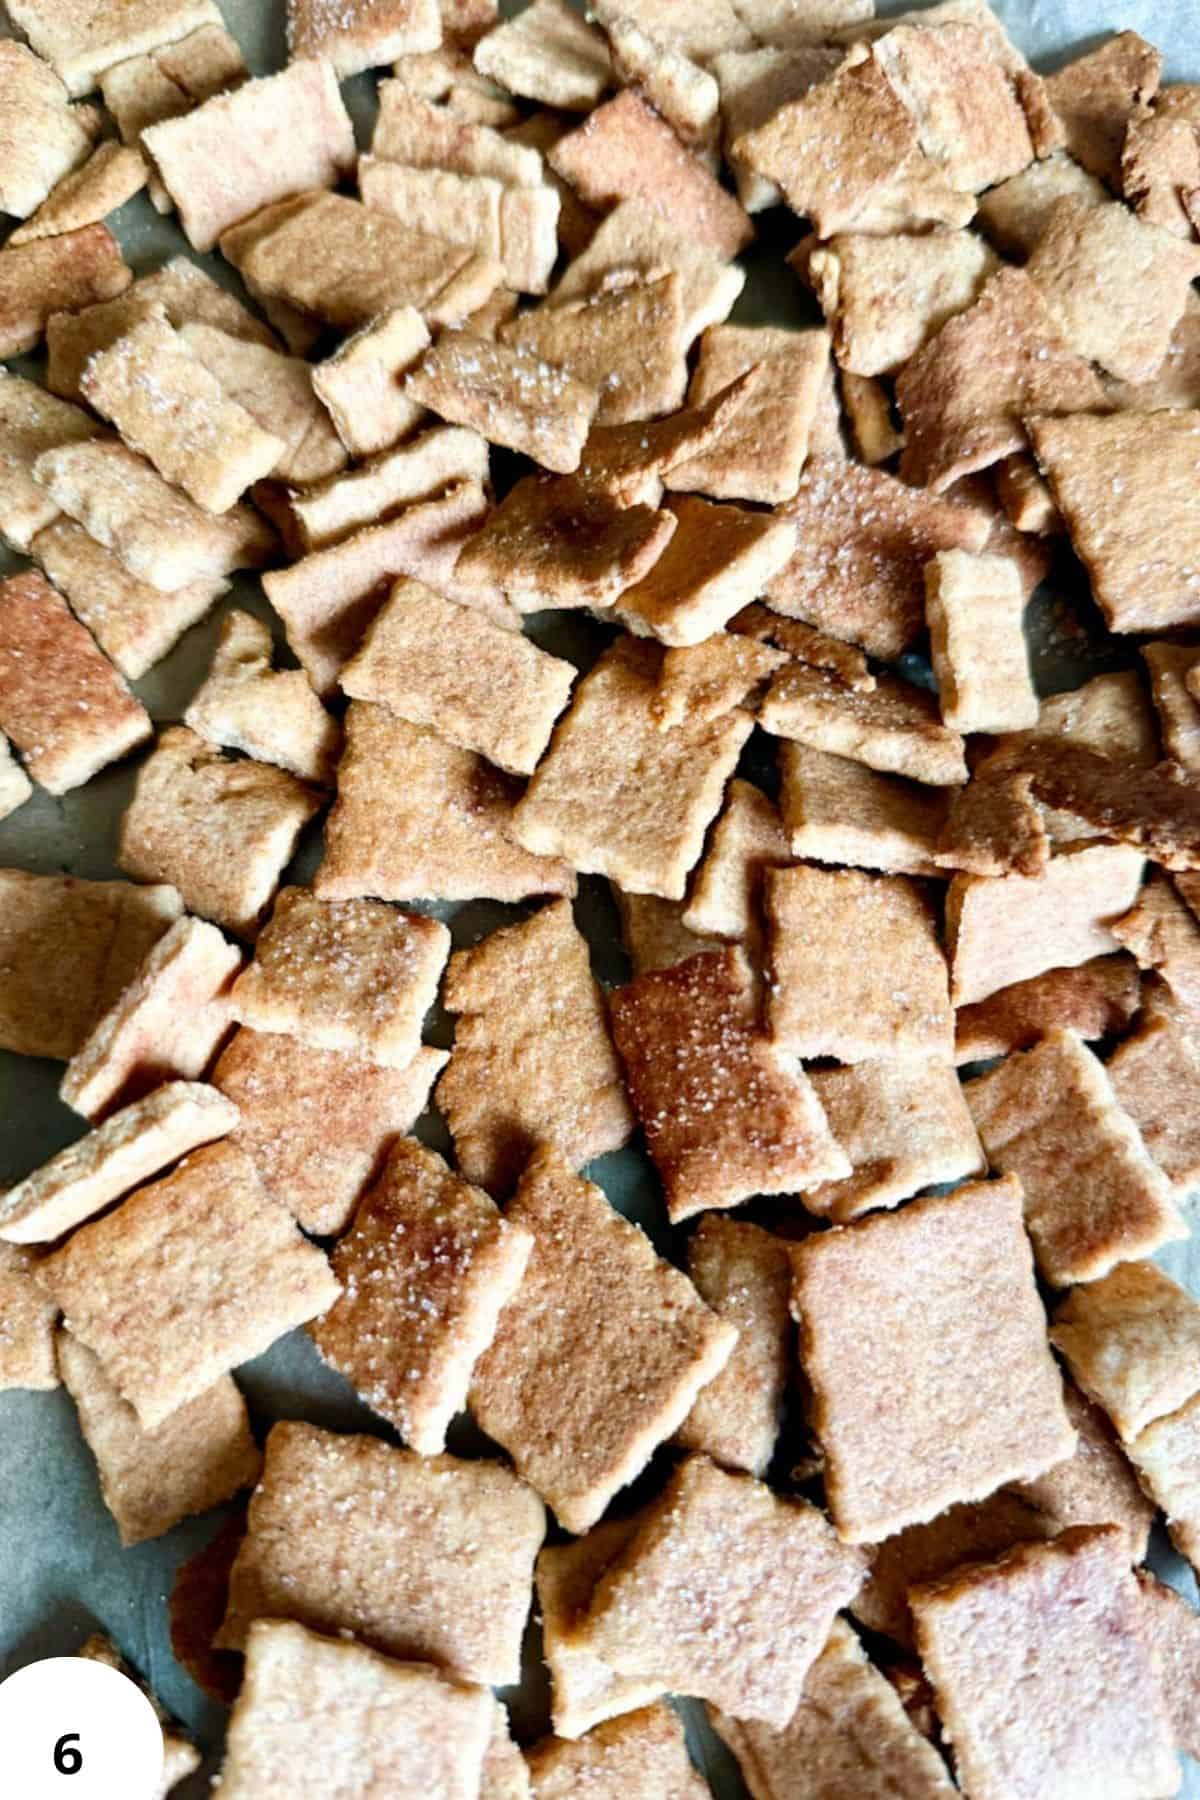
Step 6: Transfer to a cooling rack and let cool completely (Image 6). The cereal crisps up as it cools. Do not store while warm.
Hint: If some pieces feel slightly soft after cooling, spread them back on the pan and return them to a low oven for a few extra minutes. This quick re-dry fixes almost everything.
Baking Schedule
Mix dough → Roll thin → Cut → Bake low and slow → Cool completely → Eat or store
💭Crucial Success Tips
The most important thing is rolling the dough thin enough. If it’s too thick, the cereal won’t fully crisp no matter how long you bake it. Also, resist the urge to rush the drying stage. Low heat and patience are what give this cereal its signature crunch without bitterness or burnt edges.
Recipe FAQs
Yes. While fresh-milled flour gives the best flavor, whole wheat flour from the store works well and still produces a crisp, tasty cereal.
Most often, the dough was rolled too thick or the cereal wasn’t baked long enough at the lower temperature. You can always re-crisp it in a low oven.
No. It’s lightly sweet and cinnamon-forward. If you prefer a sweeter cereal, you can add extra cinnamon sugar after baking.
How To Store Cinnamon Toast Crunch Cereal
Store in an airtight container at room temperature for up to 1 week. Make sure it is completely cool before storing or it will soften.
This cereal freezes well for up to 1 month. Re-crisp in a low oven if needed.

Other Delicious Recipes
- Fresh-Milled Sourdough Pancakes

- Fresh-Milled Sourdough Mini Pancakes (Jar Ring Pancakes)

- Fresh-Milled Zucchini Fritters

- Fresh-Milled Sourdough Hot Dog Buns
If you tried this fresh-milled cinnamon toast crunch cereal or any other recipe on my blog please leave a 🌟 star rating and let me know how it went in the 📝 comments below! Happy Baking!
Fresh-Milled Cinnamon Toast Crunch Cereal
Ingredients
- 80 g Fresh-milled hard white wheat flour
- 120 g Fresh-milled white rice flour Short- or medium-grain white rice works best, or very finely milled white rice
- 85 g Honey
- 60 g Olive oil or melted butter
- 70 g Water
- 1 g Baking soda
- 2 g Cinnamon
- 1 g Salt
- 25 g Cane sugar
- 3 g Cinnamon
Instructions
- Add all the dough ingredients except the cinnamon to a bowl and mix until a soft, pliable dough forms. It should be smooth and easy to handle, not sticky, similar to play dough. If it feels dry, add water one teaspoon (5 ml) at a time. If it feels sticky, dust lightly with wheat or rice flour.I usually just use all-purpose flour here because I don’t want to turn my mill on again for a small amount. Important note: With fresh-milled flour, resting the dough is often helpful. In this recipe, it is intentionally skipped. The goal is minimal gluten development for a crisp texture, and the high amount of rice flour hydrates very quickly and does not benefit from resting. Resting can make the dough more elastic and harder to roll thin. I’ve rested the dough before when I didn’t have time to finish, and it still worked fine.
- Sprinkle the cinnamon over the dough and fold it in gently a few times. Leave visible cinnamon streaks. Do not fully mix it in.
- Place the dough between two sheets of parchment and roll it very thin, about 1–2 mm thick (roughly 1/16 inch). Thinner dough means crunchier cereal. Remove the top parchment and sprinkle lightly with cane sugar (or extra cinnamon, if you like).
- Cut into small squares about 1–1.5 cm, or around ½ inch wide. Perfect shapes are not necessary.
- Transfer the parchment to a baking sheet and bake briefly to set the dough. - Conventional oven: 190°C (375°F) for 6–8 minutes - Convection oven: 175°C (350°F) for 5–7 minutesLower the oven temperature and continue baking until fully dry and crisp.- Conventional oven: reduce to 150°C (300°F) and bake 15–25 minutes- Convection oven: reduce to 135°C (275°F) and bake 12–20 minutesRotate the pan once or twice. The cereal is done when the pieces feel firm and dry with no softness in the center.
- Transfer to a cooling rack and let cool completely. The cereal crisps up as it cools. Do not store while warm.
Nutrition
Video
Notes
Tips for Best Crunch
Soft white wheat keeps the cereal tender. Rice flour adds snap without grittiness. Roll thinner than you think. Let the cereal cool fully before storing.How to Serve
Serve with cold milk, sprinkle over yogurt, mix into granola, or eat straight from the jar.Private Notes
Tried this recipe?
Please leave a rating!Need Help Tweaking This Recipe?
Other Fresh-Milled Recipes You'll Love


Sarah says
This was my favorite childhood cereal. With the cost of groceries going up, I haven't bought it in years. So excited to be able to make it at home!
Tina says
It's a labor of love, but it does save quite a bit of money too, yes =D
camryn says
i loved this recipe and will try again. I struggled with rolling out the dough evenly enough that it can bake evenly in oven. do you have any tips for that?
Tina says
I hear you, rolling the dough out is my least favorite part of this recipe :/ other than using two pieces of parchment paper and a lot of elbow grease, I don't have any tips, sorry! Although, if your dough was sticky, try to use a bit more flour next time, that will help!
Pamella says
I want to try this recipe this weekend. I am thinking of running the dough through my pasta roller so that it makes sheets like for lasagna. How do you think that would work?
Tina says
Hmm it might! The only concern I have is the potential stickiness of the dough...can you run it through a pasta maker with a parchment paper lol? If you do try it, please report back!
Amy says
My family can not have folic acid which is in most white rice. Can this be made with brown rice? And can it be milled in a wondermill?
Tina says
Hi Amy!
I'm not sure about brown rise and if you can mill it, but you can simply use hard white instead of rice flour. I've tested this recipe doing that too, and other than the end result being a bit lees crunchy, it was the same, so still very very good 🙂